This method for dealing with seam edges gives a very neat finish. It’s more time-consuming than some of the other methods as you need to cut bias strips of fabric, there are two lines of stitching for each seam and a lot of pressing but it does look nice…
To start, cut 2.5cm-wide bias strips from a thin, closely woven fabric (cotton lawn is ideal). Depending on how long your seams are, you may need to sew the strips together to form a longer strip.
Step by step instructions for Hong Kong finish
Sew your seam first (right sides together), press open then do the seam finish. I’ve made this sample with contrasting fabrics and threads so that you can see what’s going on – normally you’d match the colours as closely as possible.
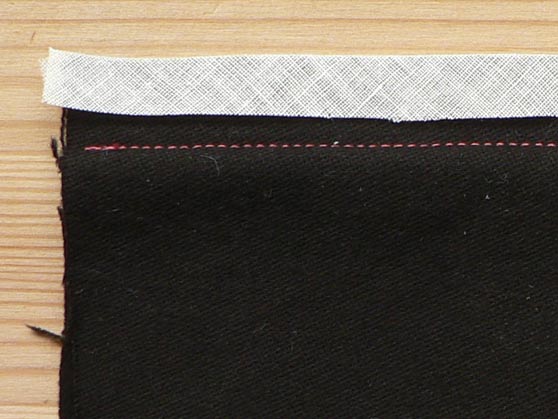
Pin the bias strip to the edge of the seam allowance. Don’t bother with tacking.
Stitch 6mm in from the edge (line fabric edge up with the inner edge of feed dog notch – near the 1.0 line – rather than foot).
Press.
Fold bias strip up and away from fabric edge. Press. (Sorry, this is a rubbish over-exposed picture.)
Fold bias strip over fabric edge and press again.
Pin bias strip in place.
Stitch on the top side of the seam allowance along the first line of stitching (called stitching in the ditch).
Press again to set the stitches. Repeat seam finish on the other seam edge.
The finished look…
That’s it. This is the visible bit of the seam finish:
And this is the underneath:
Some hints and tips
- This seam finish is easiest to do on straight seams but it works OK on curves.
- If you’re inserting a zipper, finish the seam edges first as it’s very hard to do afterwards (this I found out the hard way…)
- It’s more effort but probably best to cut your own bias strips so that you can get the width right. You could use ready-made bias binding though.
- I found that 2.5cm was about the right width – it gave me enough fabric so that it catches in the stitching on the underside of the seam allowance. You could use a narrower strip but you would need to sew very close to the fabric edge.
- This seam finish does add bulk to the seams so it’s best used on heavier fabrics. Use a very light-weight fabric for the bias strips.


{ 7 comments… read them below or add one }
What a lovely, helpful and terrific blog you have! Well done you. Rachael
Thank you! Steph
I found it easy to follow n I worked the seam finish like a professional. Thank you
thanks… very helpful…!!!
I’ve been looking all over and couldn’t find a single page that made sense. I think the biggest obstacle was the pictures not being clear enough. I know it goes inside the “jacket” so couldn’t understand everyone saying right sides together. Finally, with your blog, I can see that this is an odd finish that puts a little “cap” on each side of the seam…not something I want to do with the item I’m working on because I’m looking for something with drape…but at least I now know what it is! Probably even bookmark it in case I ever decide to do it.
Hi, Glad you found it helpful. You’re right – the Hong Kong seam finish is something you’d use on heavy fabrics if you’re making an unlined jacket or a tailored dress. It would be too bulky for a garment where you want lots of drape.
All the best,
Steph
This is awesome. Thanks!